Silk Art
Supplies: Have available water color brushes, water cups, ice tray palettes,
tacks, masking tape, canvas stretcher bars 12"x48", 2" wide plastic packing tape,
silk fabric 45"wide (8mm habotai, approximately one yard accommodates twelve students),
liquid water-colors or silk dyes, water based metallic resists, and nibs with
12oz. squeeze bottles. Embroidery hoops with silk can also be used for this project.
Materials can be found at Rupert, Gibbon and Spider, Healdsburg, CA and RileyStreet,
Santa Rosa, CA. Picture books of fish and the ocean will give students ideas for
drawing. Other themes can be adapted to this art process - for example, butterflies,
or fish studies. White lightweight 8-˝"x11" paper, pencils, and medium tip marking
pens are needed for preliminary drawings.
Note: If your classroom raises silk worms, this project is a fun accompaniment. Students of all ages and abilities appreciate the processes and outcomes of painting on silk.
- Assemble the four tongue-and-grove corners of the wooden stretcher bars
into a 12"x48" rectangle. With the frame laying on a table, protect the exposed
wooden surface of the frame with plastic packing tape. This will allow for
easy wash up. Tear a 10 ˝"x45" strip of silk across the 45"width of the bulk
fabric. Using tacks in all corners of the silk strip, attach the silk to the
12"x48" stretcher bars. To further secure the silk, attach the sides of the
strip directly to the stretcher bar in the following manner. With masking
tape attach one side of the silk to one of the 48" stretcher bar sides. Then
on the opposite side, stick half the width of the tape first to the silk,
then pulling the silk taut, stick it to the other stretcher side bar. With
resist in a nib-topped squeeze bottle and a ruler, draw three straight lines
across the 45" width of stretched silk to create four equal sections. Four
students will work on this stretcher bar, each having a 10-˝" x 11 Ľ" silk
segment.
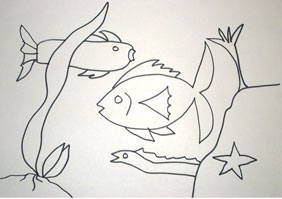
- Using paper and pen, have students design a drawing, creating various elements
of a fish image (fig.1). Note that there are no broken lines. This creates
boundary lines to contain color areas. Any opening in a line will allow liquid
color to flow out of the color area. Remind the students to make the drawings
medium to large in size and add in some elements of a marine environment.
The 8"x10" paper drawing can be taped on the underside of the silk if the
student wishes to trace his design.
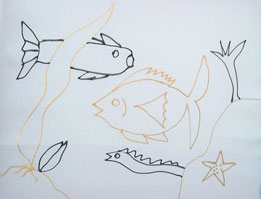
- Pour the metallic resist into a ˝ oz. plastic bottle, replace the top and
screw on the metal nib. While touching the silk with the metal nib of the
resist bottle draw or trace over the fish design (fig.2). Make sure the metal
nib always touches the silk while drawing. Connect and close up the resist
boundary line so the liquid colors will remain in place. Let the resist dry
before brush painting.
- Place liquid colors in pockets on one side of an ice tray palette. In some
of the pockets on the other side of the palette, add small amounts of water
that can be used to lighten and make pastel colors. Rinse brushes in a cup
of water. Now brush the liquid colors on the silk, watching them migrate and
blend as they move through the silk (fig.3). If both light and dark color
shades are used in the same area, apply the light shade first. Try stripes
and dots of color. Salt lightly sprinkled on wet colors gives an interesting
pattern. When the four paintings on the stretcher bar are completed and, dry
cut apart.
- Nice frames can be made out of colored construction paper, 12"x18". Make
a template out of tag board 12"x14 Ľ" with a cut-out window creating 2" side
borders, and 1 ˝" borders at the top and bottom. Using the template, a ruler,
and a razor knife, the teacher can cut multiple colored frames at one time.
In a separate step the teacher cuts white construction paper to 12"x14". Butt
the 14" edge of the white paper against the 14 ˝" edge of the colored-cut-frame
on a table and make a tape hinge. Place the silk art on the 12"x14" white
backing paper, secure the silk with tape, and fold down the colored window
at the hinge. Have students sign their name on the paper frame.
- Rinse out the metal nibs on the resist squeeze bottles, because if the
acrylic dries in the nib, it destroys the nib. Wipe down the packing tape
on the stretcher bars between sessions. The palettes can be either stored
full of liquid color in a plastic bag for use in the near future, or rinsed
with water.
Back
© Deborah Padrick 2001