Overlapping Shapes and Color Mixing
Supplies: Obtain dry pan watercolors sets, which contain the "primary" colors — magenta, yellow and blue (magenta is superior to red for mixing purples). Both Crayola and Prang have primary color sets, which can be obtained at RileySt. Art Supplies in Santa Rosa, CA. Also needed are: permanent, medium-point black pens, fresh flowers held in a variety of vases and containers, water, brushes and small plastic plates on which to mix color. Two or more vases are needed per group work station to demonstrate overlapping shapes.
Note: This art session entails drawing floral subjects with the pens, followed with blended watercolors over the drawing. This works wonderfully with both very young and older students.
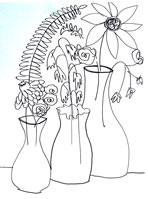
- Look at the vases. Notice how the vase in front covers a portion of the vase behind. Also notice how the vase in front appears closer to you, which in the drawing, is represented by drawing the vase closer to the bottom edge of the paper. Using pen, draw the closer vase about 2" inches above the bottom edge of the paper. The base of the vase is represented with a slight curve to show roundness. Now draw the two sides of the vessel, and complete the opening at the top with an oval shape.
- To draw the second vase, which is slightly behind and hidden by the first vase, the curve of the base of the new vase should be drawn somewhat further from the bottom of the edge of the paper. Finish the sides of the vase and the oval opening.
- The flowers can now be drawn, extending out of the vases reaching out to the sides and top of the paper. Include a variety of flower shapes and sizes. Notice how the flowers attach to the stem.
- The vases still appear to be floating in space. To understand how to depict the vases on a table, the student should put her chin close to the table and notice how the back table edge disappears behind the vases. When drawing the back table edge start it above the bottom of the vase and disappearing behind the vase. Students now sign the front of the paper with pen.
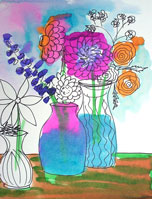
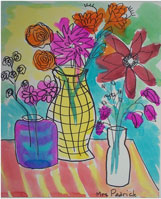
- Show the students a color chart and how two primary colors make the secondary colors. Ask students to wet a brush and brush some yellow on appropriate places in the drawing. Next, students rinse the brush and apply magenta watercolor to the drawing. Next, after rinsing the brush again, students place a puddle of yellow on a section of the plastic plate. They then rinse the brush, pick up a small amount of magenta to mix into the yellow on the plate, creating orange, which can now be brushed onto the paper. Now, students place a puddle of magenta in a new spot on the plastic plate. Rinse the brush and pick up a small amount of blue to mix with the magenta, which produces purple to brush into the picture. To make green, rinse the brush really well, pick up yellow paint, placing it in a clean area of the plastic plate, adding a small amount of blue.
- Students work toward completion of the paintings, experimenting with color mixing and lightening the colors with more water. Keep the colors thin and transparent with water. Add colors to the "air" surrounding and touching the flowers. Make new colors on the plastic plate, but rinse your brush often to keep the pan watercolors clean.
Back
© Deborah Padrick 2001