Clay Creations
 |
 |
Coming soon
... vessels |
|
|
|
Coming soon
... vessels |
Supplies: A 25 lb. bag of low fire, non-toxic clay for younger grades. Clay, glazes and firing services can be purchased at Creative Ceramics, Santa Rosa, CA., (707) 545-6528. Teacher's tools consist of a wire or heavy fishline to cut the clay and a large board on which to place the drying clay creations. Each student needs a 10"x10" wooden board to work on, and various tools.
Tools: popsicle sticks, the spools from thread or adding machine paper, skewers, opened paperclips, chop sticks, plastic forks, garlic presses, flat sticks, (a small cup of water, optional).
Note: Demonstrate clay projects, one step at a time having all students complete each step before the next step is demonstrated. Please read project descriptions for all grades levels, as the techniques for later projects build on earlier techniques.
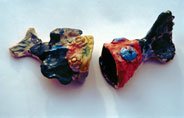
Kindergarten - A Fish Relief Wall Sculpture
- Study the parts of a fish and read a fish story. Cut a chunk of clay (approximately 4"x4"x1") with fishline and place on student work board.
- Take the clay in hand and tear off a corner to use later.
- Holding the clay in hands form the clay an oval shape, patting this shape between the hands until it is about the thickness of a piece of toast.
- Squeeze one end of the flattened oval clay and shape it into a tail.
- Using a popsicle stick, cut a mouth, shape it, make a coil and add on lips if desired. Coils are made by rolling a piece of clay on a board. Press and "weld" on all clay additions. Clay "welding" requires careful and thorough blending of clay where two pieces are joined.
- Using the extra torn off clay, use fingers to shape fins for the top, bottom and side. Push the clay and weld on the fins.
- To make an eye take a small ball of clay and press it into the fish using the end of a spool, or go around the ball using a popsicle stick to weld on the eye.
- Use the popsicle stick to make slight indentations representing scales.
- The teacher needs to put two holes with a chopstick into the top side of the flat fish for hanging cord. Check all clay additions to make sure the welding is sturdy and, finally put the student's initials on the back of the flat fish relief. Sometimes the fish can be curved instead of completely flat. Let the clay dry, fire, have the children glaze their fish on one side only and fire again.
First grade - Hollow Fish Sculptures
- Give each student a chunk of clay approximately 4"x4"x1", instruct students to tear off part and form the rest into a flat oval shape as in the kindergarten project.
- Cut the oval shape with a popsicle stick to give it a rectangular shape.
- Form a hollow tube from the clay rectangle, overlap the edges that meet to make the tube and weld the seam.
- Squeeze one end of the tube to form a fish tail, add on clay or scratch in texture as desired.
- The other end of the tube is the mouth. Roll a coil on the work board and add to the mouth as fish lips, weld inside the coil lips.
- Form fins with fingers from extra clay and weld to the fish body. Using fingers, support the clay tube from the inside when welding on the fins.
- Using tools, add on eyes, scales and gills. Set fish upright on work board.
- Teachers need to check weldings. Also, if body tube clay becomes too thin you can press extra clay on the inside for support. Put initials on the bottom with an opened paperclip. Let fish sculptures dry, fire, have the students glaze all but the bottom of the fish and finish with the glaze firing.
Second Grade - Animal Sculptures
- It helps to have some animal pictures available. Use all the clay steps in the prior fish sculpture lesson until you get a welded hollow tube.
- Press and weld together one end of the tube. The other end can be the base if you wish the animal to sit vertically. The animal can also be horizontal.
- For the horizontal animal squeeze the open end of the tube to shape the neck and add on the separately made clay head with a small amount of water and welding.
- Skinny legs and tails tend to break off, so often it is useful to have the animal laying down with its tail circling back to the body for additional support. Make all additions sturdy and firmly welded to the clay body.
- Think about the texture of the fur, making marks with tools like a plastic fork, or squeeze clay through a garlic press for the lion's mane.
- Air expands inside the hollow animal. Therefore, using a wooden skewer put a hole in the bottom of the animal to keep it from exploding. Put name or initials on the bottom of the animal using an opened paperclip.
- Let the sculptures dry thoroughly and bisque fire. Have the students glaze all but the bottom of their animal as melting glaze sticks to the kiln shelf (unfired glaze can be wipped off with a wet sponge). Finish with a glaze firing.
Third Grade - Vessels
- Discuss functional ceramic art and ask for examples in the student's homes for example, bowls or lamp base.
- Give each student a chunk of clay, a work board, and various tools including a flat stick.
- Flatten the clay in hands (it sticks if flattened on the board). Cut flattened clay to form a rectangular shape and form into a hollow tube. Form a small circle of clay slightly larger than the tube and place it on one end of the tube. An alternative method for welding uses the flat stick to blend clay by tapping in texture marks while joining parts. Use the stick to lightly tap the circle of clay all the way around, welding it onto the bottom of the vessel, also tap where the tube seam joins. Whenever tapping with a stick, for support, put fingers inside the tube. Clay designs may be added to the sides of the vessel. Using a finger place a small amount of water on the vessel, lay clay designs on the vessel (a coil or torn pieces of clay) and lightly tap with stick welding the clay designs to the body of the vessel. Tap the top edge of the vessel with a stick to make a design on the lip of the vessel.
- Try another vessel by welding on additions and not using the stick. A face on the side of a vessel might be fun.
- Another type of vessel is a coil pot. Roll out a clay coil on the board, form the coil into a spiral for the bottom of the pot. Keep adding new coils, starting to form the pot upward. Constantly weld the inside coils of the pot smooth by using the back of your fingernail or a popsicle stick. Continue adding coils until the pot is done. Make your first coil pot small.
- Finish with bisque and glaze firings.
Back
© Deborah Padrick 2001