Paste Batik Heart Design
(A 2-session lesson)
Caren McLerran and Laura Drake
Robert L. Stevens Elementary School
|
Click
on image to see it larger
|
||
Grade: Kindergarten
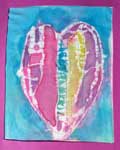
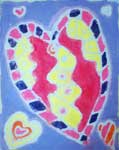
Description: Batik is a resist method of creating design on cloth or paper through the use of a resist material (paste) and a coloring agent (Jacquard brand fabric paint or other desired fabric paint or dye). The design elements (hearts, lines, squiggles, geometric shapes, etc.) are created on the cloth with a liquid flour/water paste, then allowed to dry. When dry, the white areas are painted with the fabric paint. When the paint is dry, the hardened paste is cracked and removed, then the fabric is pressed with an iron. The finished piece is mounted in a paper frame for wall decor. If desired, the students' pieces could instead be sewn together into a quilt or made into individual pillows.
Objective: Paste batik is an exciting, almost "magical" type of activity, which delights and intrigues young children. The child is exposed to new media and textural dimension through the use of paste, fabric, and dye. The use of the squeeze bottle promotes eye-hand coordination and strengthens small hand muscles.
This lesson satisfies standards 2.0 (2.1, 2.6) for California State Standards for Visual Arts.
Materials:
- Paste: ½ cup flour, ½ cup water, 2 tsp. alum
- Plastic squeeze bottles
- Muslin fabric
- Masking Tape
- Cardboard backing (9"x12") or other sizes
- Jacquard paint for silks
- Brushes
- Pencils for drawing designs
- Cups or ice cube trays for paint
- Iron
Session One
Discuss the various media we have used this year in our artwork: crayons, colored
pencils, markers, watercolor, tempura paint, collage, gluing simple objects
such as buttons, cotton, sequins, macaroni, etc, and our most recent project
with puffy paint.
Tell students that we will make a beautiful heart using paste in a squeeze bottle just like our puffy paint but that this time we will use our paste to draw lines and shapes inside a heart that we will trace from a pattern.
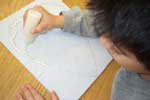
Demonstrate: On muslin that is taped onto cardboard, trace the large heart pattern with a pencil. Inside the heart, draw designs and patterns that create enclosed areas of white fabric, so that once the paste resist is applied, the paint will be contained within the boundaries. Encourage the designs to be simple so that the paste lines will not run together or create puddles.
|
Click
on image to see it larger
|
||
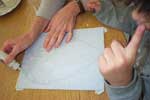
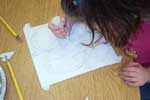
Once the design is penciled in,
the paste is dispensed on the left side of the design first (if the child is
right-handed, and vice versa for left-handed students) so as not to smear the
wet paste. Be sure to connect all lines, so that all spaces are enclosed.
Allow paste to dry flat overnight.
Session 2
Observe the dried paste and help students to press down on the paste to crack
it. Have several paint colors available. White ice cube trays can be great for
mixing and diluting colors.
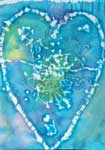
Demonstrate: Show students how to brush on the paint, putting color everywhere there is fabric showing. Allowing colors to bleed into one another, as in a watercolor, adds a nice effect.
Allow the paint to dry flat. When it is dry, chip off the paste with fingers or a butter knife.
Iron each batik with a medium hot iron. The finished product may be mounted, matted, framed, hung on a stick, made into a pillow, or any other way you or your students see fit.
© 2003 Deborah Padrick